Remington Pole Saw Parts: Where to Find & How to Replace Them
The Lifeline of Your Remington Pole Saw: Why Genuine Parts Matter
As a chainsaw and outdoor power equipment specialist, I’ve seen countless tools come through my shop, and one truth always stands out: the lifespan and performance of your equipment are directly tied to the quality of its components. Your Remington pole saw is no exception. These tools are invaluable for safely tackling overhead branches, whether you’re a homeowner maintaining your property or a professional on a job site. But like any hard-working machine, parts wear out. When they do, choosing genuine Remington pole saw parts isn’t just about brand loyalty; it’s about ensuring safety, maintaining peak performance, and extending the overall life of your investment.
Table Of Content
- The Lifeline of Your Remington Pole Saw: Why Genuine Parts Matter
- Understanding Common Wear and Tear on Your Pole Saw
- Diagnosing Issues & Decoding Your Pole Saw’s Anatomy
- Your Go-To Guides: Manuals and Parts Diagrams
- Common Symptoms and Their Usual Suspects
- Sourcing Remington Pole Saw Parts: Your Best Options
- Authorized Dealers and Online Retailers
- Local Hardware Stores and Service Centers
- Step-by-Step: Replacing Key Remington Pole Saw Components
- Replacing the Cutting Chain: A Step-by-Step Guide
- Swapping Out the Guide Bar
- Tackling a Worn Handle or Extension Pole
- The Motor/Powerhead (When to Call a Pro)
- Pro Tips for Extending Your Pole Saw’s Life & Performance
- Regular Cleaning and Lubrication
- Proper Storage Techniques
Using authentic parts guarantees a perfect fit and material compatibility, designed to meet Remington’s stringent engineering standards. This means your saw will operate as intended, reducing the risk of premature failure or even dangerous malfunctions. Think about it: a poorly fitting chain might jump the bar, or a weak motor component could overheat, leading to costly damage or worse, an accident. Trust me, I’ve seen the aftermath of using generic, ill-fitting parts – it’s rarely a good outcome. Stick with what’s designed for your saw, and you’ll save yourself headaches (and potentially stitches) in the long run.
Understanding Common Wear and Tear on Your Pole Saw
Even with meticulous care, certain components of your Remington pole saw are simply destined to wear out faster than others due to the nature of their work. The cutting chain is perhaps the most obvious candidate; it constantly grinds through wood, subject to friction, impact, and heat. The guide bar, which supports the chain, also takes a beating, developing burrs, wear spots, and a widened groove over time. Beyond the cutting attachment, moving parts within the powerhead, such as motor brushes (on electric models) or carburetor diaphragms (on gas models), can degrade. Even the ergonomic handle and extension poles can crack, warp, or become loose after years of use and exposure to the elements.
Regular inspection is key to catching these issues before they escalate. After each use, take a few minutes to visually check your chain for dullness, damage, or excessive stretch. Inspect the guide bar for uneven wear or pinched areas. Pay attention to how the handle feels in your grip and if the extension pole locks securely. These small preventative checks can help you identify which Remington pole saw parts might be nearing the end of their service life, allowing you to plan for replacement before a critical failure brings your work to a grinding halt.
Diagnosing Issues & Decoding Your Pole Saw’s Anatomy
Before you can replace a part, you first need to know what’s wrong and what specific component needs attention. This is where your inner detective comes out! Diagnosing pole saw issues often involves a combination of observing symptoms, understanding how your saw works, and consulting the invaluable resources Remington provides. Don’t be intimidated; with a little guidance, you’ll be troubleshooting like a seasoned pro.
Start by observing the symptoms. Is the saw not cutting efficiently? The chain or bar is likely the culprit. Is it sputtering or refusing to start? For gas models, check the fuel, spark plug, or carburetor. For electric, look at the power cord, switch, or motor. Is there excessive vibration or noise? This could indicate a loose component or a deeper internal issue. By systematically addressing these questions, you can narrow down the potential problem areas and pinpoint the Remington pole saw parts that need your attention.
Your Go-To Guides: Manuals and Parts Diagrams
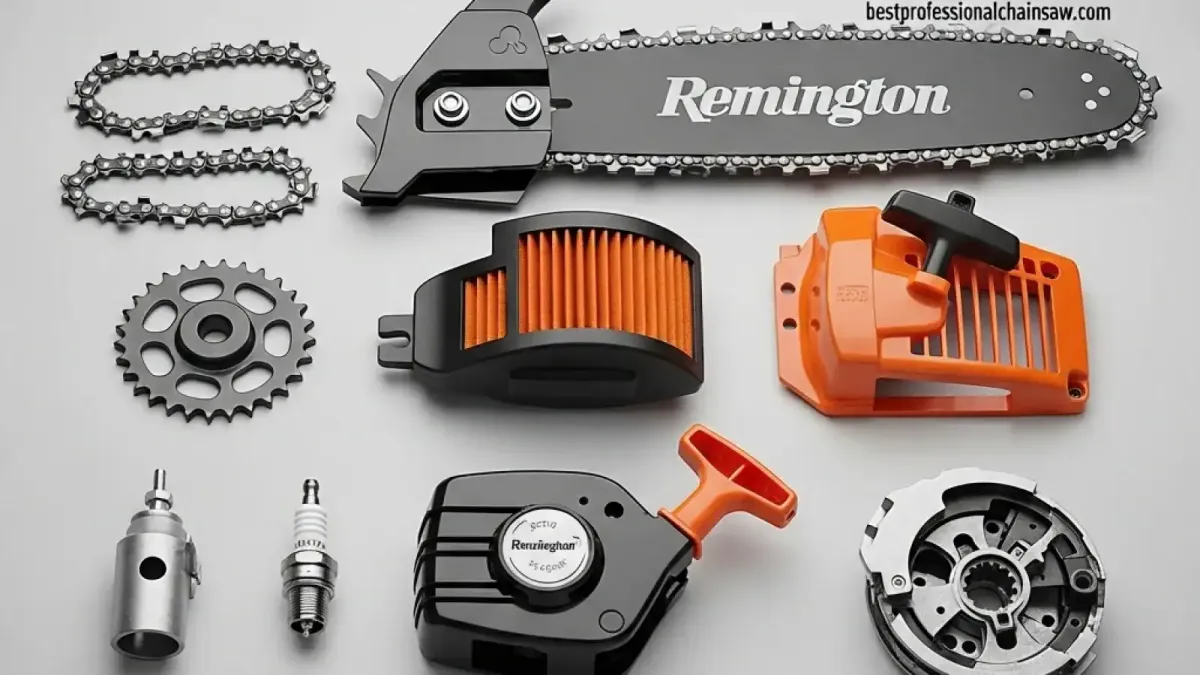
Every Remington pole saw comes with an owner’s manual, and if you’ve misplaced yours, don’t fret; they’re almost always available for download on Remington’s official website or through their support channels. This manual isn’t just for first-time setup; it’s a treasure trove of information, including safety guidelines, operating instructions, maintenance schedules, and often, a comprehensive parts list and diagram. The parts diagram, in particular, is an exploded view of your pole saw, showing every single component in its correct position and often assigning a unique part number.
Learning to read these diagrams is like having X-ray vision for your saw. When a part breaks, you can visually locate it on the diagram, identify its corresponding part number, and understand how it connects to surrounding components. This is crucial for ordering the correct replacement and for reassembling everything properly. For example, if you have a Remington RM1025S electric pole saw and need a new chain tensioner screw, the diagram will show you precisely where it is and its unique identifier, preventing guesswork and costly mistakes. Always refer to the manual specific to your pole saw model, as parts can vary even within the same brand.
Common Symptoms and Their Usual Suspects
- Poor Cutting Performance: If your saw struggles to cut, produces sawdust instead of chips, or simply bounces off the wood, the first suspect is almost always the chain. It might be dull, improperly tensioned, or installed backward. The guide bar could also be worn, preventing the chain from moving freely.
- Saw Not Starting (Gas Models): Check your fuel mix (is it fresh 2-stroke fuel?), the spark plug (is it fouled or damaged?), the air filter (is it clogged?), or the carburetor (is it gummed up?).
- Saw Not Starting (Electric/Battery Models): Ensure the cord is plugged in securely and undamaged, the outlet is live, or the battery is fully charged and properly seated. The power switch itself could be faulty.
- Excessive Vibration or Noise: This could indicate a loose chain, a bent guide bar, a worn clutch (on gas models), or internal motor issues. Stop using the saw immediately and investigate.
- Oil Leakage: If your saw’s automatic oiler is leaking, check the oil cap, the oil lines, and the oil pump assembly. A cracked reservoir or a loose hose clamp could be the culprit.
Sourcing Remington Pole Saw Parts: Your Best Options
Once you’ve identified the specific Remington pole saw part you need, the next step is finding a reliable source. While the temptation might be to grab the cheapest generic option, remember our earlier discussion about the benefits of genuine parts. Your goal should be to find authentic Remington components that ensure compatibility, performance, and safety. Luckily, there are several avenues to explore, each with its own advantages.
Before you even start looking, make sure you have your pole saw’s exact model number and the specific part number you need. This information is usually found on a label on the saw itself, and definitely in your owner’s manual or the parts diagram. Having these details handy will streamline your search and prevent ordering the wrong component, saving you time and frustration.
Authorized Dealers and Online Retailers
The most reliable place to find genuine Remington pole saw parts is through authorized Remington dealers or their official online store. Authorized dealers often have direct access to Remington’s inventory, ensuring you get the exact OEM (Original Equipment Manufacturer) part. They also typically have knowledgeable staff who can help you verify part numbers or even offer advice on installation.
Major online retailers specializing in outdoor power equipment are another excellent resource. Websites like Remington Power Tools’ Parts & Accessories section, Amazon, eReplacementParts.com, or Jack’s Small Engines often stock a wide array of Remington parts. The convenience of online shopping, coupled with detailed product descriptions and customer reviews, makes this a popular choice. Just be sure to double-check the seller’s reputation and return policy, and always verify part numbers against your manual to avoid any discrepancies.
Local Hardware Stores and Service Centers
For common wear-and-tear items, your local hardware store or outdoor equipment dealer can be a lifesaver, especially if you need a part immediately. Stores like Home Depot or Lowe’s often carry generic replacement chains and bars that fit many popular pole saw models, including Remington. While these might not always be “genuine Remington” branded, reputable brands like Oregon or Stihl offer high-quality aftermarket chains and bars that are fully compatible, provided you match the pitch, gauge, and drive link count correctly. For example, a 3/8″ low-profile, 0.050″ gauge chain with 40 drive links is a common size for many Remington pole saws.
Additionally, local small engine repair shops or outdoor power equipment service centers often stock frequently needed parts or can order them for you. The advantage here is the expert advice and the ability to physically compare your old part to the new one. They might even offer to install the part for you, which is a great option for more complex repairs or if you’re short on time. For urgent repairs, finding Remington pole saw parts near me through these local options is often the fastest solution.
Step-by-Step: Replacing Key Remington Pole Saw Components
Now for the hands-on part! While every pole saw model might have slight variations, the general principles for replacing common components remain consistent. Always prioritize safety: disconnect the spark plug wire on gas models or remove the battery/unplug the cord on electric models before performing any maintenance or repairs. Wear appropriate personal protective equipment (PPE) like gloves and safety glasses. Have your owner’s manual handy for specific torque settings or detailed diagrams.
Replacing the Cutting Chain: A Step-by-Step Guide
The chain is the heart of your pole saw’s cutting ability, and it’s the most frequently replaced part. A sharp, properly tensioned chain makes a world of difference in cutting efficiency and safety.
- Safety First: Ensure the saw is unplugged/battery removed (electric) or the spark plug wire is disconnected (gas). Put on sturdy work gloves.
- Loosen the Bar Nuts: Use a wrench or the multi-tool often included with your saw to loosen the two nuts that secure the guide bar to the powerhead. You don’t need to remove them completely, just loosen them enough so the bar can move freely.
- Adjust Chain Tension: Turn the chain tensioning screw (usually located on the side of the bar near the powerhead) counter-clockwise to retract the tensioner pin fully. This will allow the guide bar to move closer to the powerhead, loosening the chain.
- Remove the Side Cover and Old Chain: Carefully remove the side cover that holds the guide bar. Lift the old chain off the drive sprocket and then slide it out of the guide bar groove. Take a moment to inspect the drive sprocket for wear; if the teeth are sharp or hooked, it might be time to replace it too. Clean out any sawdust or debris from the chain brake area.
- Install the New Chain: Orient the new chain correctly. The cutting edges (sharpened parts) of the teeth should face the direction of rotation (usually forward, towards the tip of the bar). Place the chain around the drive sprocket first, then carefully fit it into the groove of the guide bar, ensuring it runs smoothly all the way around.
- Reattach the Side Cover & Tension: Slide the guide bar back onto the mounting studs. Ensure the chain tensioner pin engages with the hole in the guide bar. Replace the side cover and hand-tighten the bar nuts. Now, turn the chain tensioning screw clockwise to tighten the chain. A properly tensioned chain should be snug against the bottom of the guide bar, but you should still be able to pull it around the bar freely by hand (with gloves!). There should be no visible sag on the underside of the bar.
- Final Tightening & Check: Once tensioned, fully tighten the bar nuts. Give the chain a final check for tension and free movement. Reconnect power/spark plug, and briefly run the saw to ensure everything is working correctly and the chain doesn’t loosen under power.
Swapping Out the Guide Bar
The guide bar supports the chain, and over time, its groove can widen or the rails can become uneven, leading to poor cutting and chain wear.
- Safety First: As with chain replacement, ensure power is disconnected and wear gloves.
- Remove Chain: Follow steps 1-4 from the chain replacement guide to remove the side cover and the old chain.
- Remove Old Bar: With the chain off, simply slide the old guide bar off the mounting studs.
- Inspect and Clean: Clean any sawdust or debris from the bar mounting area on the powerhead. Check the oil port on the powerhead to ensure it’s not clogged.
- Install New Bar: Slide the new guide bar onto the mounting studs. Ensure the oil hole on the new bar aligns with the oil port on the powerhead.
- Reinstall Chain & Tension: Follow steps 5-7 from the chain replacement guide to install your chain and properly tension it. Remember to periodically flip your guide bar over (top to bottom) to ensure even wear and extend its life.
Tackling a Worn Handle or Extension Pole
While less frequent, handles can crack and extension poles can lose their locking mechanism, making the saw unsafe or uncomfortable to use.
- Safety First: Disconnect power.
- Identify Fasteners: Most handles and extension poles are secured with screws, bolts, or quick-release clamps. Carefully examine your specific model to locate all fastening points.
- Disassemble: Using the appropriate screwdrivers or wrenches, carefully remove the fasteners. If electrical wires run through the handle (common on electric models), note their routing and disconnect them if necessary, being mindful of their connections. Take photos if you’re unsure of reassembly.
- Remove Old Part: Once fasteners are removed, gently separate the old handle or pole section from the main unit.
- Install New Part: Align the new handle or pole section. If there are electrical wires, route them correctly through the new component and reconnect them securely.
- Reassemble & Test: Replace all fasteners, ensuring they are tightened securely but not over-torqued (which can strip threads or crack plastic). Test the integrity of the new component before use, ensuring it’s firm and stable.
The Motor/Powerhead (When to Call a Pro)
For more complex internal components like the motor, carburetor, or ignition system, DIY replacement can be challenging. While it’s possible for advanced users with specialized tools and knowledge, for most homeowners, issues with the powerhead are best left to a certified service technician. Attempting these repairs without proper training can lead to further damage, void your warranty, or create unsafe operating conditions. If your saw exhibits signs of severe power loss, smoke, or unusual internal noises, it’s a strong indicator that professional help is needed.
Pro Tips for Extending Your Pole Saw’s Life & Performance
Replacing parts is an inevitable part of owning a pole saw, but proactive maintenance can significantly reduce how often you need to do it. As an experienced arborist, I’ve learned that a little preventative care goes a long way in keeping your equipment reliable and ready for action. Think of it as an investment in your saw’s future, saving you money and frustration in the long run.
Regular Cleaning and Lubrication
After every use, especially after cutting resinous wood, take the time to clean your pole saw. Remove the side cover, guide bar, and chain. Use a stiff brush or compressed air to clear out sawdust, wood chips, and sap from the chain brake mechanism, the drive sprocket area, and the guide bar groove. Pay particular attention to the oil delivery hole on the guide bar and the bar’s rails, ensuring they are free of clogs. For gas models, keep the air filter clean, either by tapping out loose debris or washing it if it’s a foam filter (always follow manufacturer instructions).
Lubrication is just as critical. Ensure your automatic chain oiler is functioning correctly and keep its reservoir topped up with good quality bar and chain oil. Regularly check the condition of your chain; sharpen it frequently with the correct file size (often 5/32″ for common pole saw chains) or replace it when it becomes too worn or damaged. A sharp chain not only cuts better but also puts less strain on the motor and uses less oil. For gas models, ensure all moving parts on the carburetor linkage are free and lightly lubricated if specified in your manual.
Proper Storage Techniques
How you store your Remington pole saw between uses can drastically impact its longevity. Always store your saw in a clean, dry place, away from extreme temperatures and direct sunlight. If you have a gas model, drain the fuel tank or use a fuel stabilizer if it will be stored for more than a month. Old, untreated fuel can gum up the carburetor, causing starting issues and requiring complex repairs.
For battery-powered models, store batteries in a cool, dry place at a partial charge (around 50-60%) for long-term storage, as this helps preserve battery health. Remove the battery from the tool itself. On all models, ensure the guide bar cover is in place to protect the chain and bar from damage and to prevent accidental contact. By following these simple but effective maintenance and storage tips, you’ll ensure your Remington pole saw is always ready to tackle your toughest overhead cutting tasks safely and efficiently, minimizing the need for frequent part replacements.