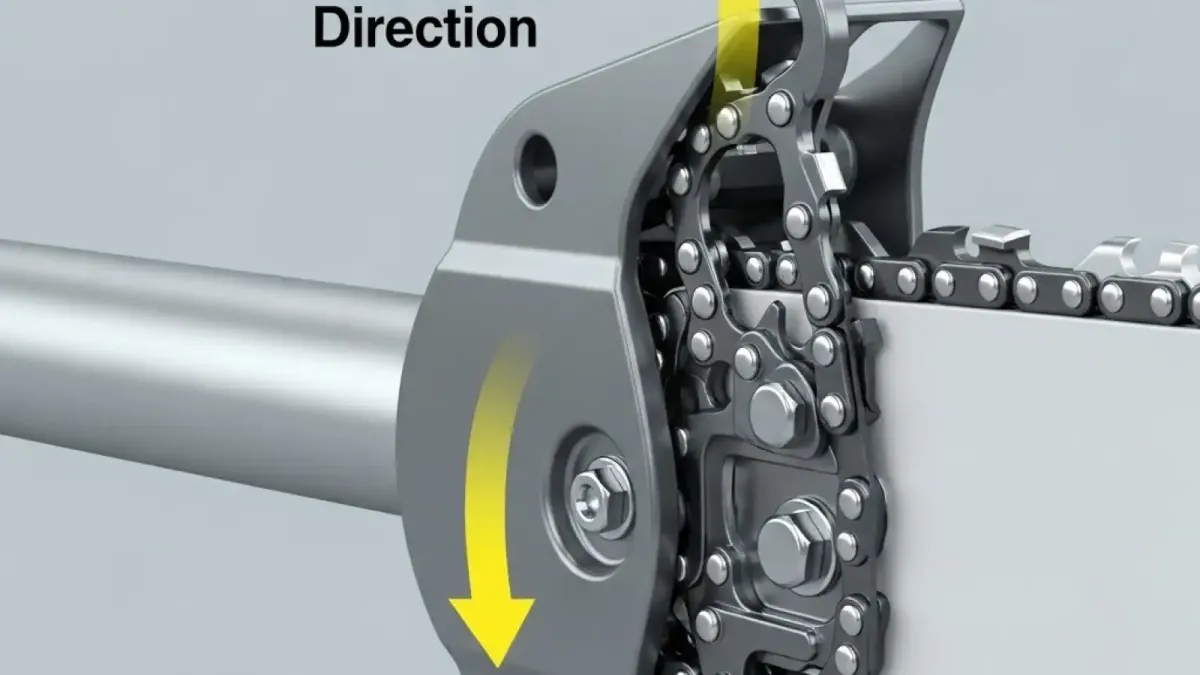
Quick answer: When looking down at the top edge of the guide bar, the sharp cutting edge of the teeth and the rakers (depth gauges) must face forward, pointing away from the engine powerhead toward the bar tip. On the bottom of the guide bar, the cutters will point backward toward the drive sprocket.
The Universal Anatomy of a Chainsaw Chain
To understand chain orientation, you need to recognize how the individual chain links interact with the wood fiber. Every saw chain consists of three main components arranged in a specific sequence: drive links, cutters (teeth), and tie straps. The cutters feature a top plate, a side plate cutting edge, and a curved raker—officially called a depth gauge—positioned directly in front of the tooth. When the engine drives the chain clockwise around the bar, the raker sets the depth of cut by riding on the wood, allowing the top plate to sever wood chips like a wood chisel.
The direction of rotation never changes regardless of the powerhead brand. Saw chains always move clockwise when viewed from the clutch side (the right-hand side of the saw body). This means the chain travels outward along the top rail of the bar, loops around the nose sprocket, and pulls inward along the bottom rail back toward the powerhead. Because the bottom rail is pulling toward you, the saw uses this force to pull itself against the wood, creating a stable cutting platform against the bumper spikes (dogs).
When selecting a replacement, match your chain pitch, gauge, and drive link count to your specific bar. Pitch dictates the distance between links (common sizes include 3/8" Low Profile, .325", 3/8", and .404"), while gauge refers to the thickness of the drive link tail (.043", .050", .058", or .063"). Installing a chain in reverse ruins these cutting dynamics instantly. Instead of slicing, the smooth backside of the cutter slams into the timber, generating intense friction that heat-discolors the bar rails and rapidly bakes off your bar and chain oil coating.
Pro tip: On real job sites, I frequently see operators misdiagnose a backward chain as a dull one, applying heavy manual pressure to push through 18-inch oak logs. This creates massive friction, rapidly heats the guide bar beyond 300°F, and stretches a fresh brand-new chain beyond its adjustment limits within two minutes. If your saw requires heavy pushing or starts producing fine sawdust instead of thick wood chips, shut off the chain brake immediately and double-check your tooth orientation.
Matching Chain Direction Across Major Brands
While powerhead designs differ between gas-powered timber saws and cordless home models, the fundamental physics of cutting remains identical. A STIHL MS 271 Farm Boss running a .325" pitch chain follows the exact same mechanical direction as a battery-powered Milwaukee M18 FUEL or a commercial Husqvarna 550 XP Mark II. However, brand-specific bar covers and chain tensioning mechanisms can alter how you align the drive links during assembly.
STIHL uses proprietary chain designs (such as Oilomatic) where the drive links feature small oil-harvesting reservoirs. When installing a STIHL chain, line up the sharp top plates facing forward along the top rail while ensuring the drive link tails seat smoothly into the bar groove. STIHL side-access chain tensioners require you to slip the drive links onto the rim sprocket first, maintaining forward tension while adjusting the pin before tightening the bar nuts to standard torque specifications.
Husqvarna Chainsaws frequently utilize spur sprockets on consumer models and rim sprockets on professional saws. Ensure the drive links wrap fully around the sprocket teeth without jamming against the clutch drum rim. Milwaukee Cordless Chainsaws use narrow-kerf chains designed for reduced power draw. Because battery saws deliver instant peak torque, installing a chain backward on a cordless unit causes immediate current spikes, triggering thermal protection cutoffs and draining the lithium-ion battery back quickly.
| Chainsaw Model Type | Standard Pitch & Gauge | Recommended Bar Length | Top Bar Cutter Orientation | Typical Fuel / Power Specs |
|---|---|---|---|---|
| Stihl MS 250 (Gas) | .325" Pitch / .063" Gauge | 16" to 18" | Points Forward (Away from saw) | 45.4 cc / 2.2 kW / 50:1 Fuel Mix |
| husqvarna 450 rancher (Gas) | .325" Pitch / .050" Gauge | 18" to 20" | Points Forward (Away from saw) | 50.2 cc / 2.4 kW / 50:1 Fuel Mix |
| Milwaukee M18 FUEL (Battery) | 3/8" Low Profile / .043" Gauge | 16" | Points Forward (Away from saw) | 18V DC / 12.0Ah Battery Pack |
| Stihl MS 500i (Pro Gas) | 3/8" Standard / .050" Gauge | 20" to 28" | Points Forward (Away from saw) | 79.2 cc / 5.0 kW / Fuel-Injected |
Step-by-Step Chain Replacement and Direction Verification
Replacing a worn chain or performing routine chainsaw sharpener maintenance requires systematic tensioning and alignment checks. Follow this standardized procedure to guarantee correct orientation, maximum cut efficiency, and operator safety every time you service your guide bar.
- Prepare the Workspace and PPE: Engage the chain brake by pushing the front hand guard forward. Put on heavy-duty leather work gloves to protect your hands from sharp teeth. Ensure the engine is off, ignition switched off (or battery pack removed), and the powerhead is completely cool to the touch.
- Remove the Side Clutch Cover: Use a combination wrench (scrench) to unfasten the guide bar nuts in a counterclockwise direction. Remove the side cover, clean out accumulated wood dust and bar oil residue around the brake band, drive sprocket, and oil delivery port using a stiff brush.
- Position the Bar and Chain: Discard the old chain or set it aside for sharpening. Lay the new chain out on a flat surface in a loop, untangling any kinks. Identify the sharp cutter edges along the top edge of the loop and point them away from the clutch loop section. Mount the guide bar over the bar studs, sliding it back toward the sprocket to create maximum slacking distance.
- Mount and Seat the Drive Links: Loop the drive links around the drive sprocket first, then lay the lower drive links into the bottom bar groove. Guide the top drive links into the upper bar rail, ensuring the cutting edges face forward toward the bar tip. Verify that the tensioning pin on the saw body aligns cleanly with the adjustment hole located near the base of the bar.
- Tension to Specification: Install the clutch cover finger-tight. Lift the nose of the guide bar up while turning the tensioner screw clockwise. Tighten until the lower drive links snug up firmly against the bottom rail of the bar. The chain should pull freely along the bar by hand (with gloves on) without sagging underneath, revealing about 1/8 inch of drive link tang when pulled downward with moderate force. Fully torque the bar nuts while holding the bar tip elevated.
Safety Risks and Mechanical Damage from Reversed Chains
Operating a chainsaw with the chain mounted backward introduces severe safety hazards. The depth gauges (rakers), which are designed to limit the bite size of each cutter, hit the wood structure after the back of the tooth body. This causes the entire saw to chatter violently across the log, eliminating operator control and spiking kickback risks dramatically. Kickback occurs when the upper quadrant of the guide bar nose contacts hard wood or brush improperly, forcing the rotating bar upward in an uncontrolled arc toward the user's face and upper body.
Beyond safety hazards, a backward chain causes rapid mechanical destruction of your cutting equipment. Without the cutting edge opening up a clean wood kerf, the drive links grinding through the tight bar channel generate extreme heat. This localized thermal stress warps the laminated core of the bar, causing the rails to spread or pinch. Excessive friction burns through your high-tack bar and chain oil instantly, leaving dry metal-on-metal contact that ruins both the drive sprocket teeth and the internal clutch bearings.
Always inspect your gear before starting work. Always wear full personal protective equipment (PPE), including denim or Kevlar chainsaw chaps rated for chain speeds up to 4,400 feet per minute, a hard hat with a mesh face shield, wrap-around safety glasses, and ear protection with a minimum Noise Reduction Rating (NRR) of 25 dB. Taking 10 seconds to verify tooth direction before pulling the starter cord prevents expensive repair bills and severe personal injury.
Definitive Recommendation for Chainsaw Maintenance
If you are a homeowner clearing fallen storm debris or cutting firewood for the season, stick with a low-kickback, semi-chisel 3/8" low profile chain matched with a standard 16-inch or 18-inch guide bar. Every time you sharpen your teeth with a dedicated file or swap out a dull loop for a fresh one, perform the basic visual check: cutter edge pointing forward on top, raker bulb placed ahead of the tooth edge. Before making your first bucking cut, start the saw, release the chain brake, hold the tip over a clean stump, and rev the engine briefly to verify proper sling off of bar oil, confirming smooth rotational physics and full lubrication system performance.
Frequently Asked Questions
Which way do the teeth face on a chainsaw chain?
On the top side of the guide bar (the side facing upward), the sharp cutting edges of the teeth must face forward, pointing away from the saw motor toward the bar tip. On the bottom of the bar, the teeth face backward toward the engine housing.
What happens if you put a chainsaw chain on backward?
The chainsaw will fail to cut into the wood, producing fine powder or smoke instead of clear wood chips. It creates intense friction that can burn out your guide bar, warp the chain drive links, drain battery runtime, and cause unsafe kickback bouncing.
How do I identify the front of a cutter link?
Look at the cutter from the side. You will see a raised curve or bump (the depth gauge or raker) followed by a sharp slant-topped metal tooth. The depth gauge always leads the way in the direction of rotation, riding directly in front of the cutting edge.
Why does my chain loosen up immediately after I install it correctly?
New chains stretch during their initial break-in run due to temperature increases and link seating. Always let a fresh chain run at half-throttle without cutting for one minute, shut off the saw, re-check slack, and adjust tension before making full cuts.
Sources
- STIHL USA Technical Service Manuals & Chain Safety Guides
- Husqvarna Chainsaw Maintenance and Chain Installation Standards
- OSHA Standard 1910.266 - Logging Operations Safety Regulations
- ANSI B175.1 Safety Requirements for Gasoline-Powered Chainsaws