



As an experienced arborist and outdoor power equipment specialist, I’ve seen firsthand how battery-powered chainsaws have transformed the way we approach wood cutting. Gone are the days of wrestling with pull cords, mixing fuel, and enduring ear-splitting noise for every small job. Modern cordless chainsaws from giants like Stihl and Husqvarna offer incredible convenience, reduced emissions, and impressive power that rivals many gas models for everyday tasks. But with great power—even electric power—comes great responsibility, especially when it comes to handling the battery.
Table Of Content
- Why Proper Battery Removal Isn’t Just Good Practice—It’s Essential
- Safety First, Always
- Maximizing Battery Life and Performance
- Facilitating Maintenance and Inspection
- Safer, Easier Transport and Storage
- The Universal Steps to Removing a Chainsaw Battery
- Preparation is Key
- Locating the Release Mechanism
- Engaging the Latch or Button
- Smooth Extraction
- Immediate Post-Removal Actions
- Brand-Specific Insights: Stihl vs. Husqvarna Battery Systems
- Stihl’s AK and AP Systems: Precision and Ergonomics
- Husqvarna’s BLi Systems: Power and User-Friendliness
- Beyond the Big Two: Other Brands
- Advanced Tips for Battery Longevity and Safe Handling
- The Golden Rules of Battery Care
- Troubleshooting Common Removal Issues
- Integrating Battery Removal into Your Chainsaw Maintenance Routine
One of the most fundamental yet often overlooked aspects of operating these tools safely and efficiently is knowing how to properly remove the battery. It might seem like a trivial step, but trust me, it’s absolutely critical for your safety, the longevity of your chainsaw, and the health of its power source. I once saw a homeowner attempting to adjust his chain with the battery still inserted, and his hand slipped perilously close to the chain. Thankfully, nothing happened, but it was a stark reminder of the importance of this simple, preventative action. This guide isn’t just about pulling a battery out; it’s about understanding why, when, and how to do it right, turning it into a confident, automatic part of your routine.
Why Proper Battery Removal Isn’t Just Good Practice—It’s Essential
Think of removing the battery as the “off switch” for your entire operation. It’s more than just powering down; it’s a complete disconnection that brings a host of benefits that impact safety, maintenance, and the lifespan of your valuable equipment. Let’s delve into why this seemingly small step carries such significant weight.
Safety First, Always
This is, without a doubt, the paramount reason. A chainsaw is a powerful, dangerous tool, and accidental activation is a risk we simply cannot afford. When the battery is removed, the saw is completely inert, eliminating any chance of it accidentally starting up. Imagine you’re sharpening the chain, a task that requires close contact with very sharp teeth. If the battery were still in and you inadvertently bumped the trigger or the safety switch, the consequences could be catastrophic. Whether you’re cleaning debris, adjusting chain tension, or performing more intensive maintenance, removing the battery provides an undeniable layer of security, giving you peace of mind.
Maximizing Battery Life and Performance
Modern lithium-ion batteries, which power virtually all battery chainsaws, are sophisticated pieces of technology. They thrive on proper care. Removing the battery and storing it correctly significantly extends its lifespan and maintains its peak performance. Leaving a battery in the chainsaw, especially during long periods of storage or in extreme temperatures, can lead to issues like “deep discharge” – where the battery’s charge drops to dangerously low levels, permanently reducing its capacity. Furthermore, storing the battery separately in a cool, dry place, ideally at a partial charge (around 30-50% for long-term storage), protects its internal chemistry from degradation, ensuring it’s ready to deliver full power when you need it next.
Facilitating Maintenance and Inspection
A well-maintained chainsaw is a safe and efficient chainsaw. Many routine maintenance tasks require the chainsaw to be completely powered down and immobile. Removing the battery grants you unobstructed access to critical components. You can more easily clean out sawdust and sap from the motor housing, inspect the guide bar for burrs or wear, sharpen the chain without fear of accidental movement, or check the oil reservoir and chain oiler system. This separation makes these tasks not only safer but also far more thorough and convenient, allowing you to give your chainsaw the attention it deserves.
Safer, Easier Transport and Storage
Anyone who’s carried a chainsaw through uneven terrain knows that every ounce matters. Removing the battery makes the chainsaw noticeably lighter, reducing fatigue during transport. More importantly, it prevents any possibility of the saw activating while being moved in a vehicle or carried by hand. Many battery compartments are designed to hold the battery snugly, but vibrations during transport could theoretically jostle a connection. Separating the battery eliminates this risk entirely. For long-term storage, keeping the battery out also protects the chainsaw’s internal electronics from any residual parasitic drain, however small, that might occur if the battery remained connected.
The Universal Steps to Removing a Chainsaw Battery
While specific models might have their own nuances, the fundamental process for removing a battery from a chainsaw is remarkably consistent across most brands. Think of these as your core principles. Once you’ve grasped these steps, you’ll be able to confidently handle almost any battery chainsaw, whether it’s a Stihl, Husqvarna, EGO, or another popular brand.
Preparation is Key
Before you even think about touching the battery, ensure the chainsaw is completely powered down. This means the motor is off, and any indicator lights are extinguished. Some chainsaws have a slight delay for residual power to dissipate, so give it a few seconds after pressing the off switch. Also, make sure your work area is clear of obstructions and that you have a stable surface if you plan to set the saw down. While not strictly necessary for battery removal, it’s always good practice to wear appropriate PPE, such as work gloves, when handling power equipment.
Locating the Release Mechanism
Most battery chainsaws are designed for intuitive battery access. You’ll typically find the battery compartment either near the rear handle, integrated into the top housing of the saw, or sometimes even underneath. Look for a clearly identifiable button, a sliding latch, or a pair of buttons. These mechanisms are almost always brightly colored (often orange, yellow, or red) or prominently positioned to make them easy to spot. This is the key to unlocking the battery from its secure position.
Engaging the Latch or Button
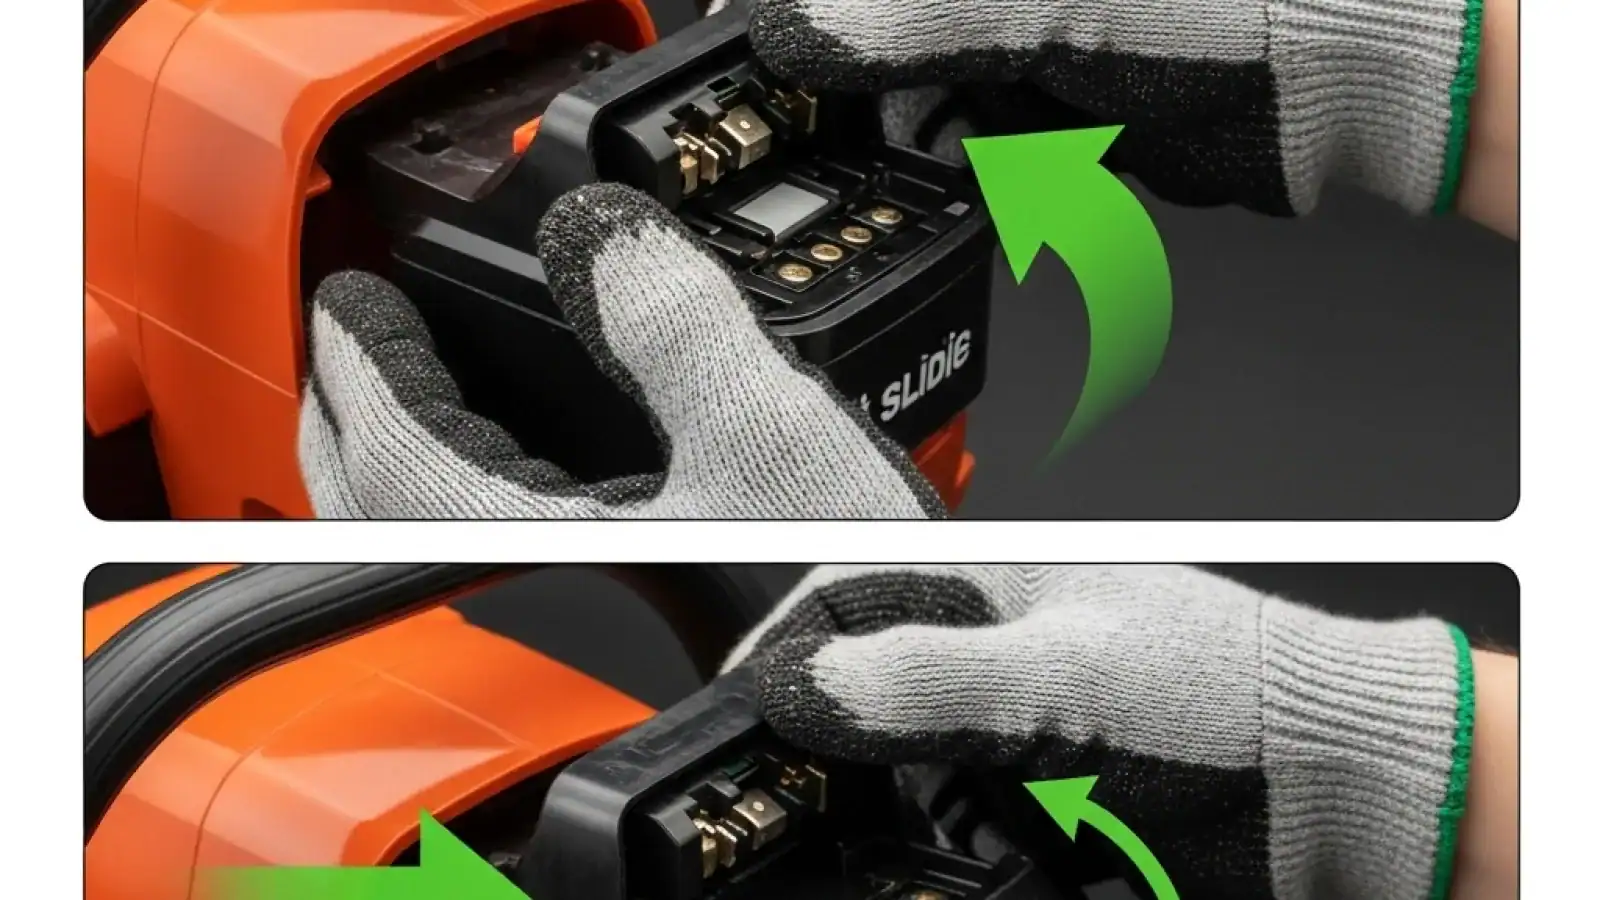
Once you’ve located the release mechanism, it’s time to engage it. This usually involves one of a few actions:
- Single Push Button: Many models, like Stihl’s AK system chainsaws (e.g., MSA 120 C-BQ), feature a single, often orange, button. A firm press is all that’s needed to disengage the internal locking clips.
- Dual Side Buttons: Some manufacturers, notably Husqvarna with their BLi-series batteries (e.g., Husqvarna 120i), utilize two buttons located on either side of the battery itself. These typically need to be pressed simultaneously to release the battery. This dual-button approach is often a safety feature, requiring a deliberate action.
- Sliding Latch: Less common in newer models but still present on some, a sliding latch might need to be pushed or pulled to unlock the battery.
The key here is a deliberate, firm action. You should feel or hear a click as the battery disengages.
Smooth Extraction
With the release mechanism engaged, the battery should now slide out smoothly from its compartment. For batteries located at the rear handle, you’ll typically pull it straight backward. If it’s on the top housing, you’ll usually pull it straight upward. Avoid yanking or forcing the battery. If it feels stuck, do not apply excessive force. Instead, release the button(s), gently wiggle the battery, and then re-engage the release. Sometimes, a small piece of debris or a slight misalignment can cause it to catch. Once it’s free, guide it completely out of the housing.
Immediate Post-Removal Actions
Once the battery is removed, take a moment to inspect both the battery terminals and the chainsaw’s battery compartment for any dust, dirt, or debris. A quick wipe-down with a dry cloth can prevent connection issues down the line. Then, proceed to store the battery in a safe, appropriate location (more on this below) and carry on with your chainsaw maintenance or storage as planned. Making this a habit ensures both components remain in top condition.
Brand-Specific Insights: Stihl vs. Husqvarna Battery Systems
While the universal steps apply broadly, both Stihl and Husqvarna—the two titans of the chainsaw world—have distinct design philosophies for their battery systems. Understanding these nuances can make the removal process even smoother and reinforce safe handling for your specific equipment.
Stihl’s AK and AP Systems: Precision and Ergonomics
Stihl’s battery chainsaws are renowned for their robust build quality, excellent balance, and user-friendly ergonomics. They typically employ two main battery systems: the AK series for homeowners and the AP series for professional users. The battery removal process is largely consistent across both.
- Location: Stihl batteries are almost always inserted into a compartment at the rear of the saw, just below the rear handle. This design contributes to the chainsaw’s excellent balance during operation.
- Release Mechanism: Stihl predominantly uses a single, prominent orange release button. This button is strategically placed for easy thumb access. A firm press of this button releases the internal locking tabs, allowing the battery to slide out backward. Models like the popular Stihl MSA 140 C-BQ (an AK series saw) or the powerful Stihl MSA 220 C-B (an AP series saw) both utilize this straightforward, single-button release.
- Extra Features & Storage: Many Stihl batteries feature an LED charge indicator on the battery itself, allowing you to quickly check the remaining power before insertion or storage. For storage, Stihl recommends keeping their batteries in a cool, dry place, out of direct sunlight, and ideally within one of their approved battery cases. For long-term storage (over a month), aim for a charge level between 40-60% to maximize battery health.
The precision engineering ensures a snug fit, so while it slides out easily, it won’t rattle during use. Always ensure you press the orange button completely before attempting to extract the battery.
Husqvarna’s BLi Systems: Power and User-Friendliness
Husqvarna’s battery chainsaws, leveraging their BLi battery series, are celebrated for their power, durability, and thoughtful user-centric design. Their battery removal process has its own characteristics.
- Location: Husqvarna batteries typically slot into a compartment located on the top housing of the chainsaw, behind the front handle. This central placement also contributes to good balance and weight distribution.
- Release Mechanism: Husqvarna often employs a dual-release button system. You’ll find two buttons, one on each side of the battery casing itself, which need to be pressed simultaneously. This two-point contact ensures a secure hold during operation and requires a deliberate two-hand (or thumb-and-finger) action for removal. The Husqvarna 120i, a fantastic homeowner saw, and the professional-grade Husqvarna 540i XP both exemplify this dual-button release.
- Extra Features & Storage: Husqvarna’s BLi batteries are often designed with advanced cooling technology, particularly when used with their professional chargers. This helps manage heat during demanding use and charging. For storage, Husqvarna emphasizes a cool, well-ventilated area. While their batteries are robust, avoiding confined, hot spaces helps maintain their internal temperature and prolongs their lifespan. Again, a partial charge (around 30-50%) for extended storage is ideal.
The robust BLi battery design, combined with the dual-release, provides a very secure connection, making accidental dislodgement highly unlikely during heavy cutting.
Beyond the Big Two: Other Brands
While Stihl and Husqvarna dominate the professional and high-end consumer markets, many other excellent battery chainsaw brands exist, such as EGO, Ryobi, DeWalt, and Makita. The principles of battery removal remain consistent: locate the switch, engage the release (which might be a button, a latch, or a combination), and then pull the battery straight out. Always, and I mean always, consult your specific chainsaw’s user manual. It’s the ultimate authority for your model’s unique features and recommended procedures.
Advanced Tips for Battery Longevity and Safe Handling
Removing the battery is just one piece of the puzzle. To truly get the most out of your investment and ensure safe operation for years to come, you need to think about comprehensive battery care. As a content expert in outdoor power equipment, I can tell you that a well-cared-for battery is a high-performing battery.
The Golden Rules of Battery Care
Your lithium-ion battery is the heart of your cordless chainsaw, and treating it right will pay dividends in performance and longevity. Here are some critical rules:
- Temperature Control: Avoid exposing your battery to extreme temperatures. Leaving it in a hot car during summer or in an unheated shed during winter can severely degrade its performance and lifespan. Ideal storage temperatures are typically between 50-70°F (10-20°C).
- Optimal Charge for Storage: For extended storage (more than a month), store your battery at a partial charge, usually between 30-60%. Storing it fully charged or completely drained for long periods can stress the cells. Many smart chargers have a “storage mode” that automatically brings the battery to this ideal level.
- Clean Contacts: Periodically inspect the metal contacts on both the battery and the chainsaw’s compartment. If they’re dirty or corroded, gently wipe them with a dry cloth or a cotton swab. Clean contacts ensure optimal power transfer and efficient charging.
- Use Original Chargers: Always use the charger specifically designed for your battery and brand. Off-brand chargers might not provide the correct voltage or charging profile, potentially damaging the battery or even posing a fire risk.
- Avoid Physical Damage: Treat your battery with care. Dropping it or subjecting it to hard impacts can damage the internal cells, even if the exterior looks fine. Store it in a secure location where it won’t be knocked around.
Following these rules will significantly extend the working life of your battery, saving you money and frustration in the long run.
Troubleshooting Common Removal Issues
Even with the best practices, you might occasionally encounter a stubborn battery. Don’t panic, and definitely don’t force it. Here’s what to check:
- Battery Feels Stuck: Often, this is due to a small piece of sawdust, a wood chip, or dirt wedged between the battery and the housing. Release the button(s), gently wiggle the battery, and try again. Sometimes, a slight twist (without excessive force) can dislodge debris. Inspect the compartment for visible obstructions.
- Release Mechanism Not Working: Ensure you’re pressing the button(s) firmly and completely. On dual-button systems, make sure both are depressed simultaneously. If the mechanism still doesn’t engage, check if the battery is inserted correctly and fully seated. A partially inserted battery might not allow the release to function.
- Battery Won’t Reinsert: If the battery won’t go back in smoothly, check for debris again. Also, ensure you’re aligning the battery correctly with the tracks in the compartment. Never force it; proper insertion should feel smooth and secure, ending with a satisfying click.
Most issues are minor and easily resolved with a bit of patience and a visual inspection. If problems persist, consult your user manual or contact the manufacturer’s customer support.
Integrating Battery Removal into Your Chainsaw Maintenance Routine
For me, removing the battery is the absolute first step in my post-cutting routine. It’s not just about storage; it opens the door to complete maintenance. Once the battery is out, you can:
- Thoroughly Clean the Chainsaw: Use a brush and compressed air to remove sawdust, sap, and debris from the motor housing, cooling vents, and guide bar groove.
- Inspect and Sharpen the Chain: With no power, you can safely handle the chain. Check for dull teeth, damage, or proper tension. Sharpen it with a file or a dedicated sharpener as needed.
- Inspect the Guide Bar: Check for burrs, wear on the rails, and ensure the oiling hole is clear. Flip the bar periodically to ensure even wear.
- Check Chain Oil Levels: Refill the chain oil reservoir. A well-oiled chain is a happy, long-lasting chain.
- Wipe Down Battery Contacts: As mentioned, a quick wipe ensures optimal connection.
By making battery removal the gateway to these tasks, you create a seamless and safe workflow that keeps your chainsaw in peak operating condition, ready for the next job.
Learning how to remove the battery from your chainsaw isn’t just about following instructions; it’s about adopting a mindset of safety, care, and proactive maintenance. It’s a foundational skill that every battery chainsaw owner should master. By understanding the ‘why’ behind this simple action and following these practical steps and tips, you’re not just protecting yourself from potential hazards, you’re also ensuring your cordless chainsaw and its vital power source remain reliable, efficient, and ready to tackle whatever cutting tasks come your way. A little knowledge goes a long way in the world of outdoor power equipment, and this is one piece of knowledge you simply can’t afford to overlook.