

Beyond the Basics: Essential Chainsaw Felling Wedges for Safe Tree Removal (2026)

When it comes to felling a tree with a chainsaw, many users understandably focus on the saw itself: its power, its chain, and the cuts it makes. However, even the most powerful chainsaw is just one component of a safe and successful felling operation. There’s another, often overlooked, yet absolutely critical tool that can mean the difference between a clean, controlled fall and a dangerous, unpredictable situation: the chainsaw felling wedge.
Table Of Content
- The Indispensable Role of Felling Wedges in Tree Work
- Types of Felling Wedges: Choosing the Right Tool
- Plastic/Polymer Wedges
- Aluminum Wedges
- Steel Wedges
- Mastering the Art of Wedge Placement and Driving
- Pre-Felling Assessment: Crucial Before Any Cut
- The Back Cut Strategy: Where Wedges Come In
- Step-by-Step Wedge Insertion: Precision is Key
- What to Watch Out For: Common Pitfalls and Safety Protocols
- Kickback from Wedges
- Flying Debris
- Over-Wedge Situations and Improper Leverage
- Improper Wedge Selection
- Common Mistakes When Using Felling Wedges
- Frequently Asked Questions
- Can I use a regular axe to drive felling wedges?
- How many wedges do I need for felling a tree?
- What size wedge should I use for general tree felling?
These simple devices are not just accessories; they are fundamental safety and directional tools that every chainsaw operator, from the homeowner clearing brush to the seasoned arborist, should not only own but also master. They provide mechanical leverage to prevent your saw from getting pinched and, more importantly, to influence the direction of the tree’s fall, turning a potential hazard into a manageable task.
The Indispensable Role of Felling Wedges in Tree Work
Imagine this situation: you’ve made your directional notch, initiated your back cut, and suddenly, the tree begins to settle back on your saw. The chain binds, the engine stalls, and you’re left with a potentially unstable tree precariously balanced, and your expensive chainsaw irrevocably stuck. This is a common and dangerous scenario that felling wedges are specifically designed to prevent. Their primary function is to provide a mechanical force that pushes the tree open, preventing the saw bar from being pinched as you deepen the back cut.
Beyond preventing costly saw pinches, the true power of a felling wedge lies in its ability to actively influence the direction of the tree’s fall. Trees, even those that appear straight, often have a natural lean or uneven weight distribution. Wind, snow, or even previous damage can further complicate their balance. Attempting to fell such a tree without the means to correct its trajectory can lead to property damage, injury, or worse. Wedges allow you to apply targeted force, gently but firmly nudging the tree in the desired direction, ensuring it falls precisely where you want it to, away from structures, power lines, or other hazards.
Honestly, based on my many years of experience in the field, I can tell you that a chainsaw without a proper set of felling wedges is like a car without brakes – you might get where you’re going, but the risks are exponentially higher. They are an integral part of tree felling safety, allowing for more controlled and predictable outcomes, especially when dealing with larger or more challenging timber. Investing in good wedges and learning their proper use is, in my opinion, just as important as investing in quality personal protective equipment (PPE).

Types of Felling Wedges: Choosing the Right Tool
While the basic function of all felling wedges is similar, they come in different materials, each suited for specific applications. Understanding these differences is key to selecting the right wedge for the job and ensuring both your safety and the longevity of your equipment.
Plastic/Polymer Wedges
These are perhaps the most common type of felling wedge, particularly popular among homeowners and occasional users. Made from durable, high-impact plastic or polymer, they are lightweight, affordable, and, crucially, less damaging to your chainsaw chain if accidentally struck. While you should always aim to keep your chain away from any wedge, striking a plastic wedge with a moving chain is far less likely to cause significant damage or dangerous kickback than hitting a metal one. They typically come in bright colors like orange or yellow, making them easy to spot in sawdust and underbrush. They offer a good, progressive lift for most small to medium-sized trees.
Aluminum Wedges
Stepping up in durability and lifting power, aluminum felling wedges are often preferred by more experienced users and professionals dealing with tougher wood. They are significantly stronger than plastic wedges, providing more substantial lift and resistance to mushrooming under heavy impact from a felling maul. However, they introduce a critical safety consideration: hitting an aluminum wedge with your chainsaw chain can cause serious damage to the chain, bar, and even the saw’s engine, not to mention a very violent kickback. Therefore, extreme caution and precise cutting are paramount when using aluminum wedges. They are excellent for larger diameter trees where more aggressive mechanical leverage is required.
Steel Wedges
For the heaviest duty applications, such as felling exceptionally large or stubborn trees, steel felling wedges are the ultimate choice. These are incredibly durable, offering the maximum possible lifting force without deforming. They are built to withstand immense pressure and repeated heavy blows. Given their extreme hardness, striking a steel wedge with a chainsaw chain is an absolute no-go. The risk of severe damage to your saw and potentially catastrophic kickback is incredibly high. Steel wedges are typically used by highly skilled professionals who understand their limitations and have mastered advanced tree cutting techniques. They require a heavy felling maul for effective driving.
To summarize the distinctions, here’s a brief comparison:
| Wedge Type | Material | Durability | Chain Safety | Lifting Power | Typical Use |
|---|---|---|---|---|---|
| Plastic/Polymer | Nylon/Polycarbonate | Good | Low Risk | Moderate | Small to Medium Trees |
| Aluminum | Aluminum Alloy | Very Good | High Risk | High | Medium to Large Trees |
| Steel | Hardened Steel | Excellent | Extremely High Risk | Maximum | Very Large, Stubborn Trees |
Mastering the Art of Wedge Placement and Driving
Using felling wedges effectively isn’t just about hammering them in; it’s a strategic process that begins well before the first cut. Proper technique ensures maximum safety and control, guaranteeing the tree falls exactly where intended. This is where how to use felling wedges truly comes into play, blending precision with power.
Pre-Felling Assessment: Crucial Before Any Cut
Before you even think about starting your chainsaw, a thorough assessment of the tree and its surroundings is paramount. Evaluate the tree’s natural lean, the direction of the wind, and any potential hazards in its path or around your work area. Identify and clear at least two escape routes, preferably at 45-degree angles away from the planned felling direction, and always to the rear of the tree. Understanding these factors will inform your felling plan, including the size and type of wedges you’ll need, and the precise spot for your hinge and back cut. Never rush this stage; it’s your first line of defense in tree felling safety.
The Back Cut Strategy: Where Wedges Come In
Once your directional notch (or ‘face cut’) is complete, you’ll begin your back cut. This cut is made on the opposite side of the tree from the notch and should ideally be parallel to the back of the notch, a few inches above its base. As you deepen the back cut, you’ll reach a point where the tree’s weight might start to put pressure on the saw bar, signaling the ideal time to insert your wedges. The goal is to leave a hinge of uncut wood that will guide the tree’s fall. The wedges will then be driven into the back cut, effectively widening it and pushing the tree in the desired direction, while the hinge controls the fall.
Step-by-Step Wedge Insertion: Precision is Key
- Make Your Back Cut: Start your back cut on the opposite side of the directional notch, ensuring it’s slightly higher than the hinge point of your notch. Cut approximately 80-90% of the way through the tree, leaving sufficient hinge wood.
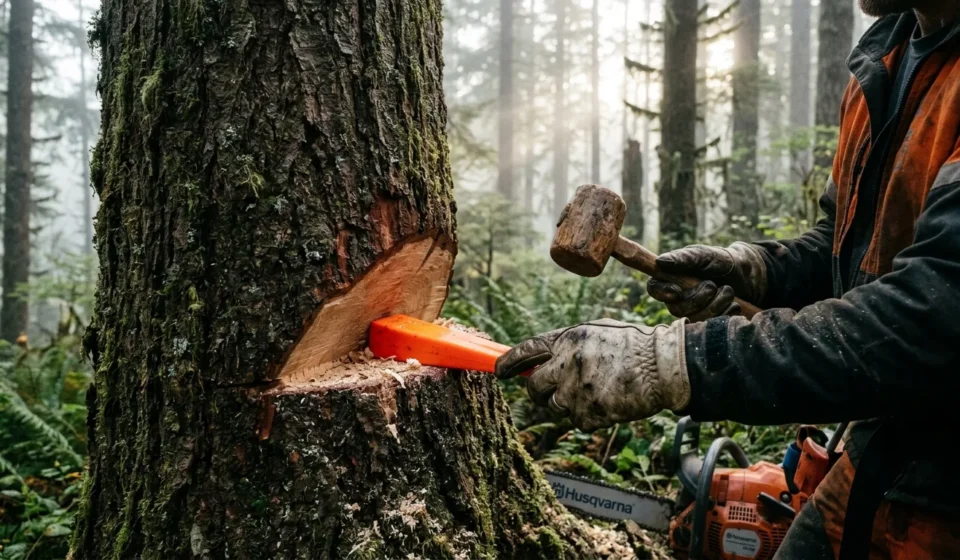
- Insert the First Wedge: As soon as you have enough depth in your back cut to accommodate a wedge, and before your saw becomes pinched, carefully remove your saw. Insert your first felling wedge into the cut, typically in the center or slightly off-center, ensuring the thin edge goes in first.
- Drive the Wedge: Using a dedicated felling maul or a heavy axe (never a metal hammer on plastic wedges!), strike the wedge firmly and squarely. The goal is to drive it in just enough to free the saw or to start influencing the tree’s lean.
- Repeat (If Necessary): For larger trees or those with a strong lean, you might need two or more wedges. Insert subsequent wedges to the sides of the first, continuing to drive them in incrementally. Distributing the force across multiple wedges can provide a more even and controlled push.
- Observe and Adjust: As you drive the wedges, constantly monitor the tree’s movement. Listen for creaks and cracks, and watch for any signs of movement. If the tree starts to fall, immediately retreat along your pre-planned escape route. If it’s not moving, continue to drive the wedges in until the tree begins to fall in the desired direction.
But what if the tree is really stubborn, and a single wedge isn’t enough? That’s precisely why having a couple of wedges on hand is always a good idea. You can insert them strategically to apply more force, or even use a larger aluminum wedge if plastic ones aren’t cutting it. Just remember the increased risk of hitting metal with your chain.
What to Watch Out For: Common Pitfalls and Safety Protocols
While felling wedges are invaluable safety tools, their improper use can introduce new dangers. Understanding these pitfalls is crucial for maintaining a safe working environment.
Kickback from Wedges
The most immediate and dangerous risk associated with felling wedges is kickback, particularly if you’re using metal wedges. If your chainsaw chain accidentally contacts a hard metal wedge while cutting, it can result in incredibly violent and unpredictable kickback, potentially throwing the saw back towards you. This is why plastic wedges are often recommended for beginners and why precise cutting and constant awareness of the wedge’s position are non-negotiable when using aluminum or steel. Always maintain a firm grip on your saw and be prepared for potential kickback, especially if you’re working in tight spaces where visibility of the wedge might be compromised.
Flying Debris
Driving wedges involves striking them with significant force. This can cause wood chips, sawdust, or even pieces of the wedge itself to fly off. It’s absolutely critical to wear appropriate chainsaw safety gear, including a hard hat with a face shield and hearing protection, before you even pick up your felling maul. Eye protection, specifically safety glasses under your face shield, is also highly recommended to protect against smaller particles that might bypass the shield.
Over-Wedge Situations and Improper Leverage
There’s a fine line between applying enough force and applying too much. Driving wedges too aggressively or using a wedge that’s too large for the cut can cause the tree to split prematurely or shatter the hinge, leading to an uncontrolled fall. The goal is a controlled, gradual shift, not a sudden, violent crack. Similarly, inserting a wedge too far away from the center of the tree’s hinge can create uneven leverage, causing the tree to twist or fall unpredictably. Always aim for balanced force and controlled application.
Improper Wedge Selection
As discussed, the material of the wedge matters. Using a small plastic wedge for a very large, heavily leaning tree is an example of improper selection. While it’s safer for your chain, it might not provide the necessary force to overcome the tree’s natural lean, potentially leading to a stuck saw or a dangerous situation where the tree doesn’t move as intended. Conversely, using a heavy steel wedge when a plastic one would suffice introduces unnecessary risk to your saw.
Common Mistakes When Using Felling Wedges
Even seasoned operators can sometimes make errors, but for beginners, these common missteps can be particularly dangerous. Let me add something here: mastering safe tree removal techniques takes time and practice, and learning from mistakes (even theoretical ones) is part of that process.
- Using the Wrong Striking Tool: Never use a metal hammer or the flat side of an axe head to drive plastic wedges. It can damage the wedge and reduce its lifespan. Always use a proper felling maul or the poll (back) of an axe specifically designed for striking.
- Not Having an Escape Route: This is fundamental tree felling safety. Failing to clear and identify escape routes before making any cuts or driving any wedges is a recipe for disaster. When the tree starts to fall, you need to be able to move quickly and safely away.
- Driving Wedges Too Early or Too Late: Driving wedges too early means you haven’t made enough of your back cut, potentially wasting effort or making subsequent cuts more difficult. Driving them too late means your saw is already pinched, and you’re now fighting a battle that could have been avoided.
- Underestimating Tree Weight or Lean: A common mistake is assuming a tree will fall easily. Always err on the side of caution. If a tree has a significant lean or is particularly large, you might need more wedges or a more powerful type of wedge than initially thought.
- Using the Saw to Clear Wood Around a Stuck Wedge: If a wedge gets firmly stuck or you need to adjust its position, never use your chainsaw to cut around it, especially if it’s a metal wedge. Use hand tools like a hatchet or a pry bar to free or reposition it.
- Failing to Leave a Proper Hinge: The hinge controls the tree’s fall. If you cut all the way through the tree or leave a very weak hinge, the wedges won’t be able to effectively direct the tree, leading to an uncontrolled and dangerous fall.
Frequently Asked Questions
Can I use a regular axe to drive felling wedges?
You can use the poll (the blunt back side) of a sturdy axe to drive plastic or aluminum felling wedges. However, a dedicated felling maul is designed for this purpose, offering better weight distribution and impact force, making the process more efficient and safer.
How many wedges do I need for felling a tree?
For most small to medium-sized trees, one or two wedges are typically sufficient. For larger trees or those with a significant lean that requires more directional control, having three or more wedges readily available is a good practice. It allows you to apply even pressure from multiple points.
What size wedge should I use for general tree felling?
The size of the wedge should be appropriate for the tree’s diameter. For general homeowner use on trees up to 18-24 inches in diameter, a standard 5.5 to 8-inch plastic wedge is usually effective. For larger timber, you might need longer or thicker wedges, or consider using aluminum options, always with increased caution.
Mastering the use of chainsaw felling wedges truly moves you beyond basic chainsaw operation into the realm of controlled, professional-level tree felling. These unassuming tools are essential for preventing dangerous saw pinches and, more importantly, for dictating the tree’s fall with precision and safety. By understanding the different types of wedges, their correct application, and the critical safety protocols, you empower yourself to tackle tree felling tasks with confidence and expertise. Always remember: safety first, and a well-placed wedge can be your best friend in the forest.